
How to Turn a Script Into a Video With AI (Complete 2026 Guide)
A complete walkthrough of turning a script into a finished AI video in AskEditor Studio. From script import to character locking to timeline export.
A finished script and a finished video used to be separated by weeks of pre-production. Now they're separated by an afternoon. The strongest AI script-to-video pipelines in 2026 read a written script, segment it, hold each character's appearance steady across every shot, and hand you a timeline you can edit. All without leaving one tab.
This guide is the one we wish we'd had when we started. Script in. Video out. Here's the workflow we run inside AskEditor Studio.
Key Takeaways
- Turning a script into a video with AI in 2026 is a 4-minute setup, not a 4-week shoot. The tooling handles segmentation, character extraction, scene generation, and timeline assembly while you direct the result.
- The script-to-video workflows that actually hold together stage the work cleanly: import, character lock, scene generation, canvas review, then timeline. Each decision gets made once and rides through the rest of the pipeline.
- AskEditor Studio runs that whole sequence in one place. The same canvas where your segments and characters live is also where your generated scenes appear, and where you hand off to the timeline.
What Is Script-to-Video AI?
Script-to-video AI is a tool category that takes a written script and produces a video sequence directly. You don't write a separate prompt for each shot. You don't draw a storyboard by hand. The model reads the script, splits it into beats, identifies the characters, generates the scenes, and lays out a timeline you can edit.
This is structurally different from a clip generator. Clip generators take one prompt and produce one clip. Script-to-video tools take an entire script and produce an entire sequence with continuity built in. The shift is from "make me a shot" to "make me a movie."
The good ones do this in a single workflow. The bad ones make you bounce between four tools and stitch the output together. That gap is what this guide is about.
A scene Studio generated directly from a single line of script. Character, motion, and pacing came out of one beat of narration, no separate prompt required.
Why Script-to-Video Matters for Creators
The script-to-screen loop used to belong to teams with budgets. Pre-production took weeks. Shot lists were a deliverable. By the time anything got to camera, you'd already burned half the timeline.
Script-to-video AI compresses that loop to hours. A writer can test a story arc by watching it play before committing to a shoot. A founder can pitch a brand film by rendering a draft. An indie creator can finish a short between Friday and Sunday.
AI isn't replacing the production team. It's removing the bottleneck between a written idea and something you can actually watch.

Studio reads the script once and turns every beat into its own scene, with narration, characters, and generated stills attached.
Step-by-Step: Turning a Script Into a Video in AskEditor Studio
Step 1: Import or write your script
Open AskEditor Studio and paste your script in, or import an existing file. It can be anything from a 30-second commercial to a 10-minute short. Studio reads it once and stores it as the source of truth for everything that follows.
Step 2: Let Studio extract scenes and characters
Once the script is in, Studio segments it automatically. Each beat becomes a segment node on the canvas, and every named character in the dialogue gets their own character node connected to the segments they appear in.
Open any segment to see the script beat it came from, plus the scene grid Studio is generating against it.
You can rearrange segments, edit their script text, or split them further if a beat needs more breathing room. Nothing is locked at this stage. You're shaping the structure before any generation happens.
Step 3: Lock character identity in the Character Library
Before any scene gets generated, the characters need to be locked. Open the Character Library, generate or upload reference images for each character, and let Studio produce a model sheet. Internally this runs the 6-phase consistency pipeline (Gemini 2.5 Flash Image for the portrait, Gemini 3 Pro for the 7-view sheet), so every angle of the character lives in the same visual universe.
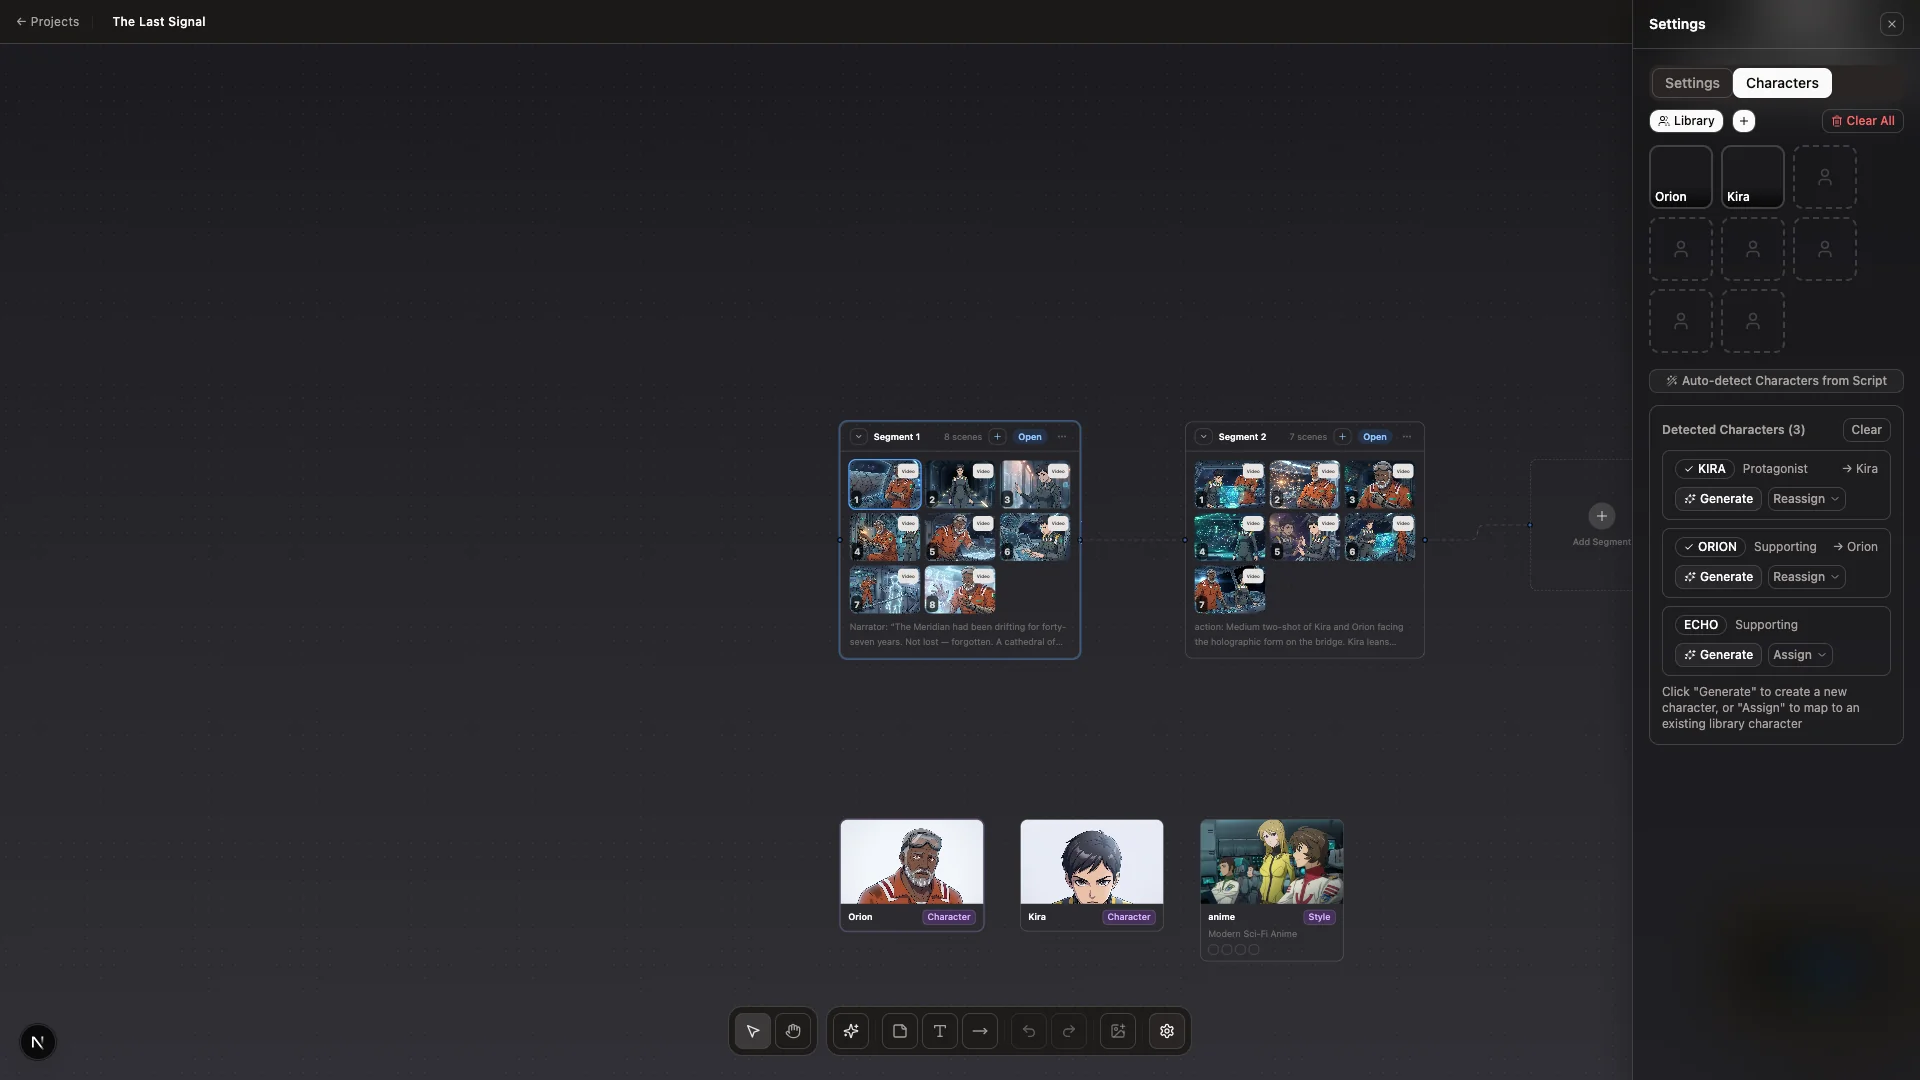
Every character carries a primary reference image and a model sheet. Both travel with every scene the model generates.
Once a character is locked, every scene that calls for them references the same model sheet. That's what makes the protagonist look like the same person in shot 3 and shot 17. Skip this step and the model invents a new face every time.
Step 4: Generate scenes against your locked characters
With segments and characters in place, Studio generates a scene for each beat. The model sees the script text, the locked character references, and the visual style, then produces both a still frame and a generated video clip for the scene.
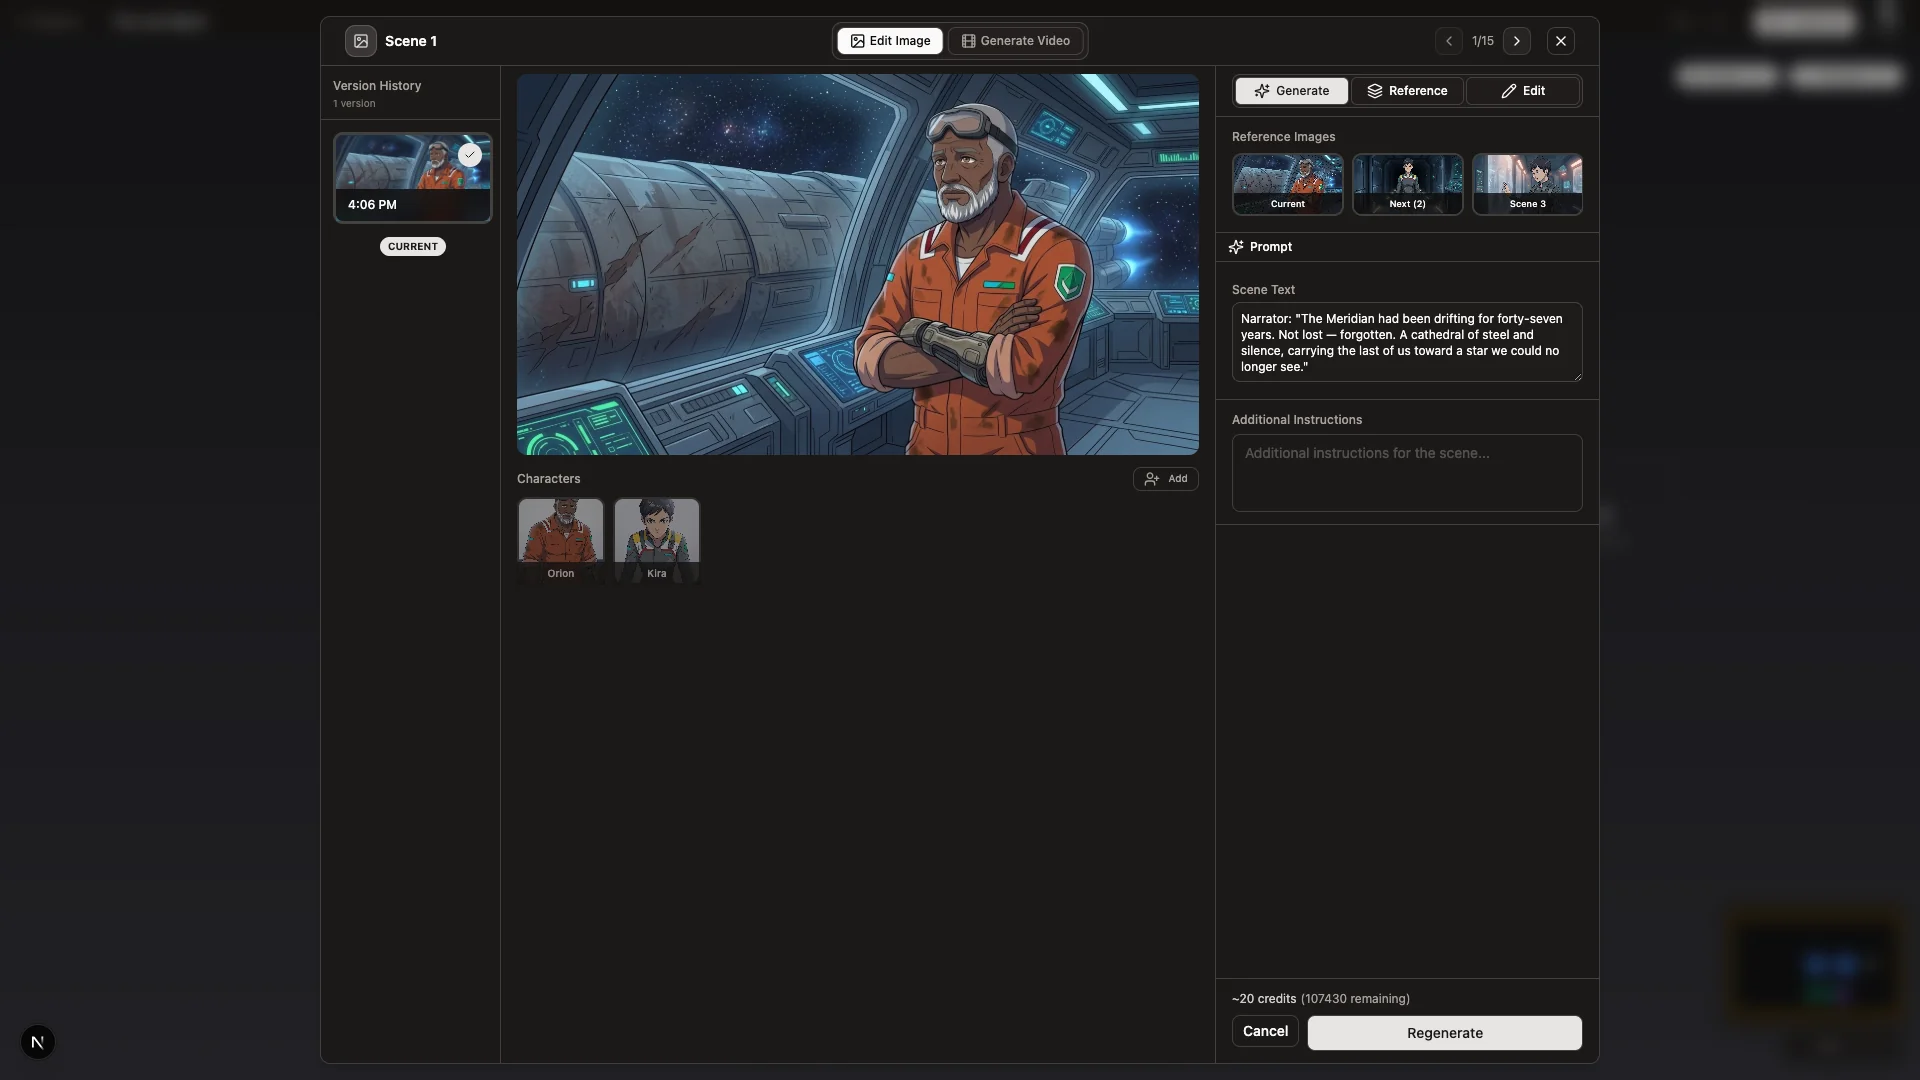
Click any generated scene to preview the video Studio produced for it, directly in the storyboard. No export step required.
Generation is iterative. If a scene doesn't land, regenerate just that one. You're not rerunning the whole sequence.
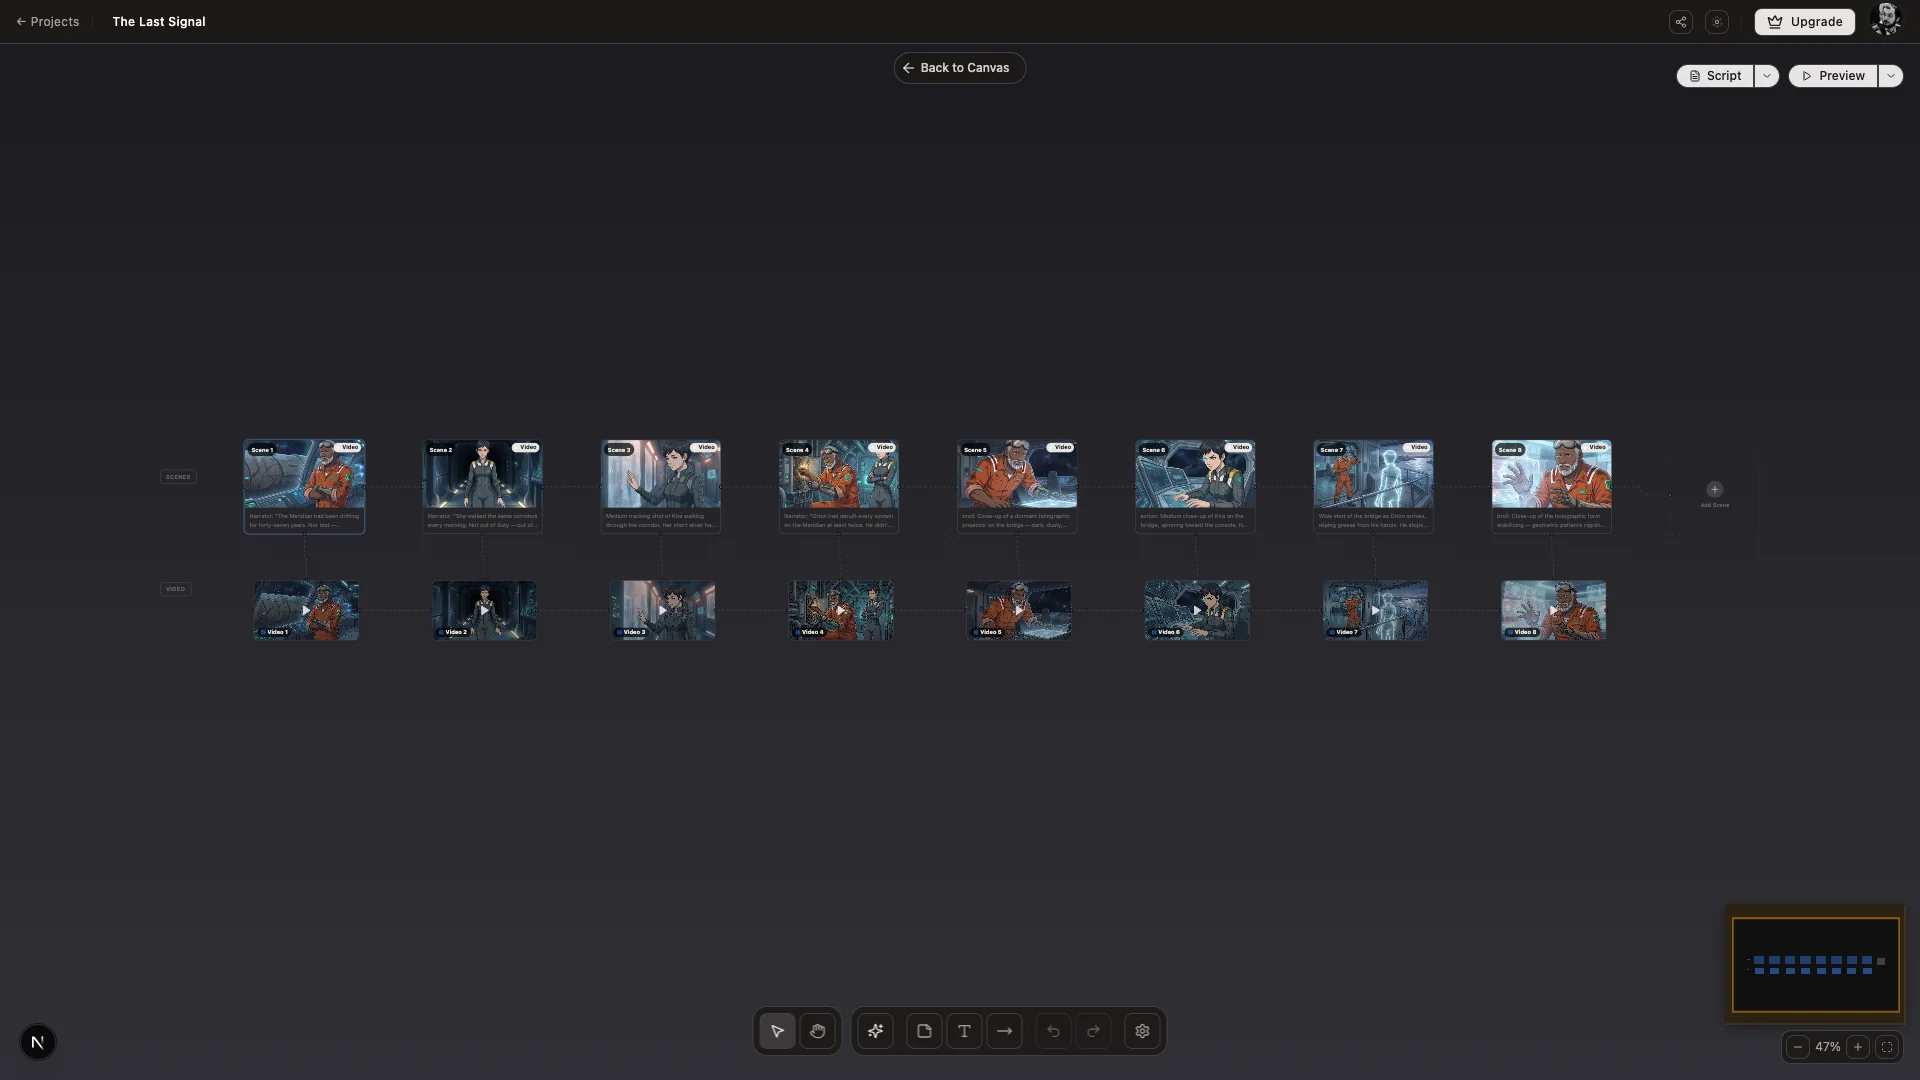
Step 5: Review and rearrange on the Canvas
The Canvas is where you direct the result. Drag segments to reorder them. Pin the scenes that work. Replace the ones that don't. The whole sequence is editable as a graph, so structural changes are visible at a glance.
This is where most of the creative judgement happens. The model produced raw material in step 4. Step 5 is where you decide what stays.
Step 6: Edit on the timeline
When the canvas looks right, hand off to the timeline. Trim shots, layer audio, drop in voiceover, add subtitles, tweak pacing. The timeline lives inside Studio, so the handoff is one click. There's no export and re-import.
Step 7: Export
Export to your target format and resolution. MP4 for delivery. Vertical for social. 4K for hero placements. Studio renders against the final timeline state and writes the file.
Advanced Techniques for Professional Results
Style anchoring. After Scene 1 lands, Studio extracts the realized rendering style and locks it as a constraint on every subsequent scene. Color, light, and line quality stay consistent across the whole sequence without re-prompting. In our own runs this is the difference between a sequence that feels stitched together and one that looks like it came from a single project.
Region editing. When a generated scene is mostly right but one element is wrong, draw a region on the scene and edit only that area. Saves the regeneration cost and preserves what already worked.
Voice match. Generate per-character voiceover (powered by ElevenLabs) with consistent voices across scenes. The dialogue stays anchored to the same character all the way through.
Multi-character composition. When a scene contains two characters, Studio composes them from both locked references in the same frame instead of generating each as a separate shot.
Pro Tips for Best Results
Write your script in beats, not prose. Studio segments better when each line carries one clear action. Prose paragraphs produce vague segments.
Generate characters before scenes. A scene generated against a character without a locked reference will be inconsistent. Lock first, generate second.
Lock style after Scene 1, not Scene 0. Style anchoring needs at least one realized scene to extract from. Generate the first scene, like the result, then let Studio anchor.
Iterate on the Canvas, not the timeline. Structural changes belong on the storyboard. Cuts and trims belong on the timeline. Don't rebuild a sequence in the timeline that should have been rearranged on the canvas.
Next Steps
Script-to-video AI in 2026 is no longer a question of whether the tools work. They do. The question is which workflow gets you from page to playback fastest, with the most creative control along the way.
AskEditor Studio is built around that question. If you have a script and you want to see it on a screen, the Studio Canvas is where to start.